Setting Up Your Own VPN Server with just $5 a month
Your Own Server, Your Own Privacy, Multiple Users

I have recently stumbled upon a video on YouTube by Wolfgang’s Channel about how to setup your own VPN server using OpenVPN. There’s also a transcript version of the video that you can read and follow along. Or you can follow my guide below.
TL;DR
In this guide, I will show you how to setup OpenVPN server on a Linux VM hosted on Linode. The cost of the VM is $5 per month (1TB traffic inclusive) but you can get free $100 credit for 60 days from this link. Since this is your own server, you can create multiple VPN profiles for multiple devices or give them to your friend or family to use.
Find a Cloud Server
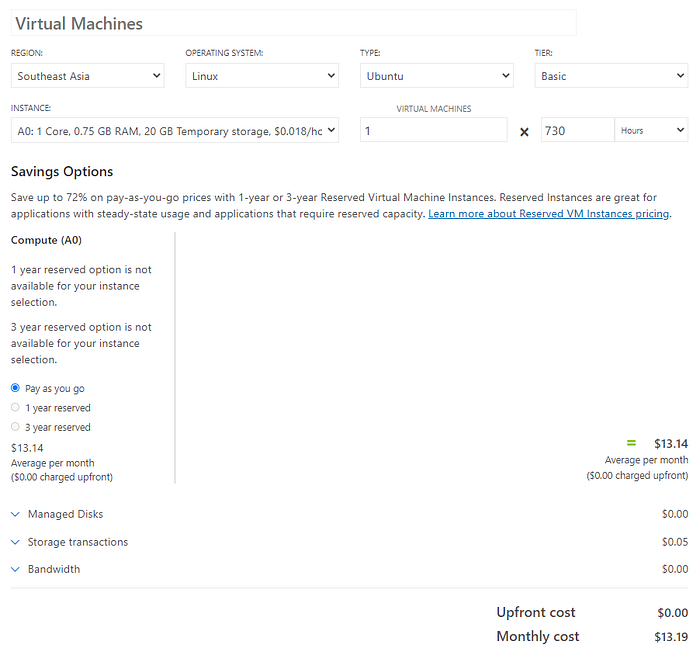
I was recently looking for a cheap virtual machines (VM) or virtual private server (VPS) solution for running my workloads. The cheapest one (1 vCPU, 0.75GB RAM) on Microsoft Azure is ~ $13/month and it only includes 5GB transfer. It could cost you ~$100/month for 1TB transfer.
I’m also looking for local providers in-country and its cheapest plan starts from ~$10/month with similar size VM (1 vCPU, 1GB RAM). But the good thing is they offer unlimited transfer. However, it may not serve the purpose of using VPN as you might not want website to know where you are from.

The cheapest one I found is Linode that offer a 1vCPU, 1GB RAM for $5/month with 1TB transfer included which should be enough for general VPN usage. It would cost $10 for each additional TB transfer.
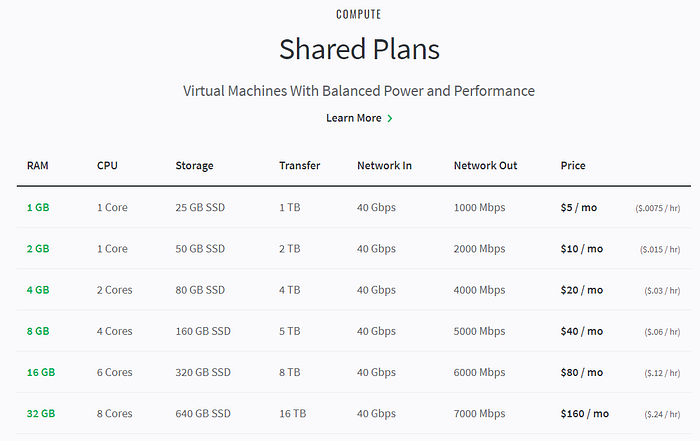
Digital Ocean is another popular provider that offer similar price. If you see any better alternative, please also let me know. But in this guide I’ll just use Linode to host my VPN server.
Create Virtual Machine
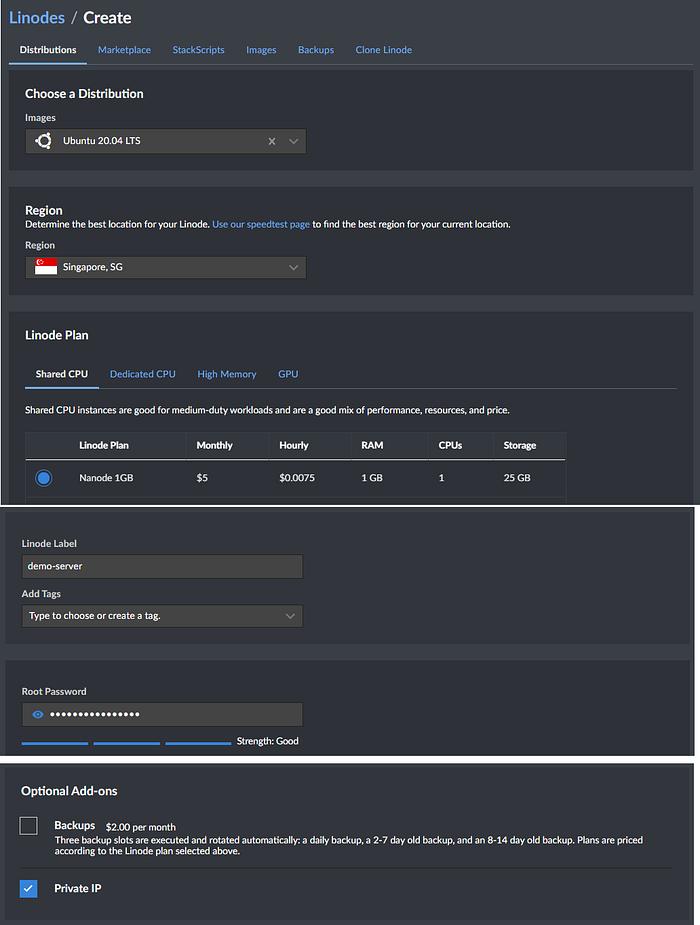
Click Create a Linode with the following parameters:
Image: Ubuntu 20.04 LTS
Region: Choose the closest one to you
Linode Plan: Nanode 1GB ($5 monthly)
Linode Label: Name your server
Root Password: Set a secure root password (we will disable root login later)
Private ID: Select to add a private IP
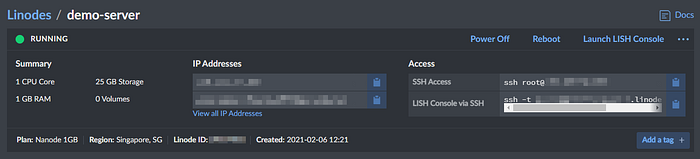
Wait until the provisioning is completed when the status turns to Running.
Try to connect to the server using your favourite SSH client. In my case, I will use SSH client inside Ubuntu distro of WSL.

Configure System
Update system
Upgrade your system
apt-get update && apt-get -y upgradeCreate User
Create a new user as using root is not a good security practice.
useradd -G sudo -m yourusername -s /bin/bashSet the password for the new user.
passwd yourusernameIf you don’t have a SSH key yet, open a new terminal and create a new SSH key on your local PC.
ssh-keygen -t ed25519You may set a passphase for better security.
Then, add the SSH key to the new user on the server.
ssh-copy-id yourusername@ip_addressConfigure SSH
On your server, edit the file /etc/ssh/sshd_config
nano /etc/ssh/sshd_configUncomment and change the following lines:
Port 12345
PermitRootLogin no
PasswordAuthentication no
For Port, change to other number than 22 to prevent SSH port scanners.
Restart the SSH service
systemctl restart sshdTest loggin in using SSH key in a separated terminal window but don’t close the current root terminal yet in case you cannot log on.
ssh yourusername@ip_address -p 12345If you can log on then you can log off the root and try logging in again. You should not be able to to log on.
Disable sudo Password
If you don’t like to enter password everytime you use sudo command then edit the file /etc/sudoers by executing the following command
sudo visudoAppend the following line:
yourusername ALL=(ALL) NOPASSWD: ALLPlease note that this reduces the security.
Change Hostname
Edit the file /etc/hostname
sudo nano /etc/hostnameChange the hostname from locahost to the name you want e.g. demo-server in my case.
Edit the file /etc/hosts
sudo nano /etc/hostsAnd add your new hostname like below:
127.0.0.1 localhost demo-server# The following lines are desirable for IPv6 capable hosts
::1 localhost ip6-localhost ip6-loopback demo-server
ff02::1 ip6-allnodes
ff02::2 ip6-allrouters
Reboot the server from your Linode console.
Create SSH alias
To avoid typing long command to login to server like ssh pacroy@123.456.78.90 -p 12345. We can create an alias for it.
Create the file ~/.ssh/config on your local PC and add the following:
Host demo-server
    User yourusername
    Port 12345
    Hostname server_domain
    IdentityFile ~/.ssh/id_ed25519
Name your alias on the first line. In this case, I name it demo-server.
For Hostname, instead of using IP address which can be changed for some cloud providers, you can use server’s domain name. For Linode, you can get the server’s domain name from the console:
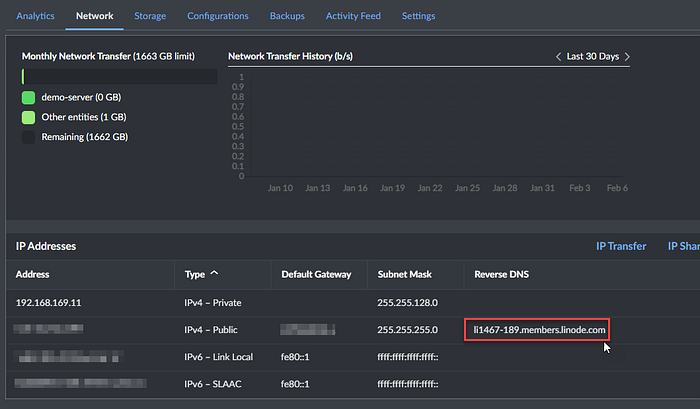
For IdentityFile, you need to specify if you have multiple SSH keys. If you have only one key then you can omit this line.
Test your alias with:
ssh demo-serverAnd you should be able to log in.
Install OpenVPN
Execute the Script
In this step, we will use the installation script from https://github.com/Nyr/openvpn-install
Execute this command to install OpenVPN:
wget https://git.io/vpn -O openvpn-install.sh && sudo bash openvpn-install.shIt will ask a few questions which you can accept the defaults by keep hitting enter.
Welcome to this OpenVPN road warrior installer!Which IPv4 address should be used?
 1) 139.162.54.189
 2) 192.168.169.11
IPv4 address [1]:Which protocol should OpenVPN use?
 1) UDP (recommended)
 2) TCP
Protocol [1]:What port should OpenVPN listen to?
Port [1194]: 443Select a DNS server for the clients:
 1) Current system resolvers
 2) Google
 3) 1.1.1.1
 4) OpenDNS
 5) Quad9
 6) AdGuard
DNS server [1]: 3Enter a name for the first client:
Name [client]: demo-serverOpenVPN installation is ready to begin.
Press any key to continue…
However, I choose the port to 443 and 1.1.1.1 as my DNS server as suggested in the original guide.
For the client name, I recommend to choose a name that can scale if you plan to create more clients for different devices or for multiple users. For example, demo-1, demo-2, etc.
Once ready, press anykey to start the installtion. It should take only several seconds to complete.
Copy the VPN Profile
You need this file to setup the client.
Copy the file and change owner so you can download it later via SSH.
sudo mv /root/demo-server.ovpn ~
sudo chown pacroy:pacroy ~/demo-server.ovpn
Disable the log
Edit the file /etc/openvpn/server/server.conf
sudo nano /etc/openvpn/server/server.confFind and change this line to verb 0
verb 0Restart the OpenVPN service
systemctl restart openvpn-server@server.serviceSetting up Your Client
Download the Profile
Use scp command to download the ovpn file to your local PC.
scp demo-server:~/demo-server.ovpn ./DownloadsDownload OpenVPN client
Head to https://openvpn.net/download-open-vpn/ and download client for your device. It supports Windows, MacOS, Linux, iOS, Android.
In this case, I’ll show how to setup the client on Windows. But the method is similar on all devices. You need to use a secure way to transfer the ovpn file to your device e.g. using cloud storage, IM, etc. Avoid using email.
Drop the ovpn file.

Click Add

Try to connect
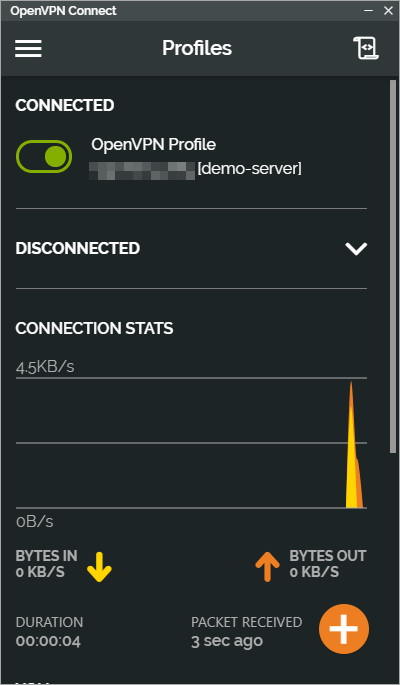
If you see the above screen then you have setup everything correctly and you’re ready to roll!
Adding More Clients
If you have multiple devices or you want to create new profile for other users. Do not use the same ovpn profile as the connection will not work well if there are multiple clients connect using the same profile. Instead, create a new client
Execute the installation script again on the server to add a new client.
sudo bash openvpn-install.shFollow the on-screen instruction to add a new client (or remove).
OpenVPN is already installed.Select an option:
 1) Add a new client
 2) Revoke an existing client
 3) Remove OpenVPN
 4) Exit
Option: 1Provide a name for the client:
Name: client-2
…
Use the same method above to download .ovpn file and send to your device to setup the client.
Setup Unattended Upgrades (Optional)
You can configure the server to automatically upgrade and reboot to apply security patches.
Install required components:
sudo apt install -y unattended-upgrades apt-listchangesFollow on-screen instruction to install Postfix.
Enable the stable security upgrades
sudo dpkg-reconfigure -plow unattended-upgradesChoose Yes.
Edit the config file.
sudo nano /etc/apt/apt.conf.d/50unattended-upgradesUncomment and update the following lines as shown
Unattended-Upgrade::Remove-Unused-Kernel-Packages “true”;
Unattended-Upgrade::Remove-Unused-Dependencies “true”;
Unattended-Upgrade::Automatic-Reboot “true”;
Unattended-Upgrade::Automatic-Reboot-Time “23:00”;
Time should be in your server timezone which is UTC by default.
Test to see if it works
sudo unattended-upgrades — dry-runNow, the system will be automatically upgraded.